Showing posts with label Ratatouille. Show all posts

Monday, May 30, 2011

It's A Wrap!

It's the moment you've all been waiting for!!!


*Drum roll*


It's the one!


*Faster drum roll*


The only!


*Super fast drum roll*


RATATOUILLE FINALE!!!!!! 


*Lots of clapping and cheering and whistling and hooping and hollering, et cetera et cetera*


Yes, it's true ladies and gentlemen! Finally, you will see the final product that has been on your hearts and minds for so long now!


But first, I gotta do it step by step before showing you the end (; And the final product included cupcakes and cakepops, so hang in there, because we'll get around to it.

Just kidding.

Here you go (:


It looks pretty sweet (: It got a LOT of compliments at the party, which made me happy (:


Wrapping things up was fairly simple. All I had to do was make the picnic mat, the menu, and put borders around the cakes.

Starting off with the mat, first I cut up a lot of red and white squares (2x2). I arranged the red squares on the mat (see how it has measurements on it to help me out? It's awesome :D), leaving space for the white squares. 


Then I arranged the white squares inside the red squares


Then to make it one piece of fondant instead of a lot of individual squares, I rolled it together. Now this was a doozy. I forgot to put some shortening on the mat so it wouldn't stick. So after rolling it, it took me forever and a lot of help from my mom to get the picnic towel off of the mat and onto the board. My recommendation? If you're gonna make a mat this way, go ahead and do it straight on the board.


The final towel still looked sort of nice though. But it had a lot of imperfections which I later covered up with veggies. The next step was giving the cakes a border. I didn't take any good pictures of that, but here's a picture at an angle that you can see the borders from.


The pot's border was time consuming, but it looked good. Initially I wanted to make it flames, but I decided that I didn't want to go through the trouble, so I did my favorite shell border, multi-colored. Then the cheese's border was just the Tip 3 all the way around.

Next was the menu. I cut out a rectangle* from a dark color, then I made a border for it using an orange-y copper color.


Then all I had to do was write on it and I went with the tiny jagged end roller that I used on the cake purse  to create a border. It looked pretty cool and it saved the cakes from any writing**

Remy and the veggies were already ready, so the rest was really just a matter of arrangement. The main focus was covering all of the imperfections on the picnic mat. So first Remy got placed in between the two cakes


Then the veggies just got tossed around conveniently wherever there was an oopsie.


Some of course where just placed wherever for aesthetics.


Veggies all over the place!


I think in the end, it looked quite nice


What do you guys think? (:


I always love to hear some feedback (:


*Can you tell that it's the same fondant that made Remy?
**I hate writing on a perfectly good cake. It just ruins it. Some cakes need writing, cause they're made that way, but pretty sculpted cakes or cakes that are meant to be something (like a cheese or a giant pot) shouldn't have writing -_-

Tuesday, May 24, 2011

Ratatouille Miscellaneous

And we continue with Ratatouille!!!

This isn't quite the last post for Ratatouille. This is for all the extra stuff that accompanied the cake (like cupcakes and cake pops). But i promise that this post will be super small. Especially since most of the cupcake stuff is already done (;

Usually just the cake is suffice, but since I was doing the whole cake table for the party, I went all out with it (:

Now, I'm sure you all remember the veggies and the cooking tools from my first few posts. Well, the veggies got spread around between the cakes, the board (you'll see that on the next Ratatouille post ;D), and the cupcakes. And the cooking tools all went on the cupcakes (:

So once you know how to make the veggies and the cooking tools, making these cupcakes is easy peasy. All I did was use the Tip 1M to create the swirly effect on the cupcakes. It's very simple. You start on one end of the cupcake and you work your way around the edge, moving towards the center. As you move with the tip, keep squeezing, and once you reach the center, release and pull up. Now, I like just doing this one layer, but Wilton teaches to do a second layer. You can see their instructions here. The way they do the first layer is the same way I do mine, except I squeeze more to make more icing come out and make the center larger.

Once I had my pretty swirl, I squished the tip with one of my veggies or cooking tools. So my cupcakes looked all pretty and Ratatouille-y like


Here's a close up


Another one:


I took the bowls and put icing in them too, to make it look like there was actually food in there, and it doubled as something to make the spoons stick.

Here's our last close up of the cupcakes (:


But cupcakes aren't all that were made! Cake pops made a scene too!

Instead of using regular chocolate to dip my cake pops in, I used colored chocolate* to make pretty red pops.


And to keep with the Ratatouille theme, I cut out some little fondant leaves and glued them on the pops to make pretty tomato pops


And those were our tomato pops! =)

That's it for this post folks, stay tuned for the ultimate Ratatouille finale!!!!


*I don't know how you make brown chocolate into red, so I just went ahead and bought already colored chocolate. But if you're gonna use white chocolate or vanilla, try coloring it.

Saturday, April 30, 2011

Who Cut The Cheese???

Yes, this is another Ratatouille post. Because after all, we all know that mice and rats love cheese! And so do the Parisians, and the movie is set in Paris. So it's only logical that we have a cheese cake in our Ratatouille ensemble!


And by cheese cake I mean a cake that looks like cheese, not an actual cheesecake. I have yet to learn how to make those. Hmm... Maybe that'll be the next learning project on my list*

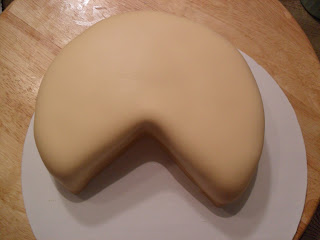
This cake was made using a normal 9 inch round pan. Then I froze the cake, as is the norm, then after it thawed I cut it in a cheese shape and iced that Swiss-erooni.
Then I covered it up in some cheesy fondant and got this lovely guy:


Up until this step, all cakes tend to be the same, with a few differences, including flavor, filling, shape, and size. The steps are: bake, cool down, freeze, thaw, ice (or ganache), cover with fondant (or apply top layer of buttercream) and voila, you have the first step of the cake and you are ready to decorate, which tends to be the hard part. But our lovely little cheese cake here was nicer to us than that. The hardest part was putting fondant all the way around on such an interestingly shaped cake.

Why was the decoration of this cake so easy you ask? Well, because all i had to do was poke some holes.


That cool little green thing right there is what I call a ball tool. It's very useful to make flowers** and holes. So, I used that little baller to poke my cheese (:


So after enjoying myself far too much***, I had this beautiful block of cheese! For a finalizing touch, I put on a wooden cutting board. Yes, I do know that cheese normally doesn't go on cutting boards, but usually rats don't cook either, so take that =P

And of course, the wooden board was cling wrapped to protect the cake (:


Making cheese cake was by far the easiest part of our Ratatouille ensemble, which made me very happy, since the rest of it was so challenging. Not that I don't love a challenge, but I can only take so many challenges in one cake. Arms falling, mats peeling****, coloring brown fondant, arms falling, eyes, hands, feet, arms falling, tails, handles, veggies, arms falling, et cetera et cetera. So the cheese cake was a nice easy deviation from the difficulties of Remy's life.

So here's the cheese cake on the final piece.


Just a little taste to keep you going (;
So come back later to enjoy the Ratatouille finale!


*Which is pretty long, so don't hold your breath for that post.
**I'll explain later.
***Who would have known that poking a cake is that much fun when there's no chocolate icing?
****You'll find out on the next Ratatouille post (;

Saturday, April 23, 2011

Pots and Pans

This is a continuation of the Ratatouille posts, because as nice as all the little fondant figurines are, they're not actual cakes. And as much as I love snacking on some fondant scraps*, fondant will never be as delicious as cake is, because cake is just amazinggggggg <3
Obviously, Remy and the veggies were made to accessorize the cake, so here is the cake (or at least one of them) that goes with Remy and his entourage.

Every piece of art begins very humbly, and so does a cake. And here is the making of Ratatouille!!!!

*Ahem* drum roll please?

*Drum roll*


What? Isn't this good enough for you???

Sigh....

This is only step one guys.
This beauty (or not so much, he's a little plain still) has this delicious chocolate cream inside called brigadeiro. It's a Brasilian sweet made out of condensed milk and chocolate powder. It's delicious <3
There are two cakes, one stacked on top of the other with the brigadeiro in the middle. Then there's a smooth layer (sorta) of buttercream covering the cake. It's only a crumb layer so it doesn't have to be perfect.

After letting the cake rest for a while, allowing the icing to become a little more stable, I covered it with brown fondant. Now here's the thing about dark colors: they SUCK! It takes forever to make a dark shade of fondant. It requires a LOT of coloring, which usually paints your hands as well as the fondant. So making dark colors is never fun. Brown, red, dark green, purple, etc. They're all in that category. Black is too, but I cheat when it comes to black. I bought a tub of Duff's black fondant so I wouldn't have to spend 30 minutes and two little tubs of coloring every time I needed black (which surprisingly enough, is often). So I don't have to color the black =)
But the black isn't what's important right now, brown is. The same brown that was used to cover the cake, was also used to create the top of the pan. The brown got rolled into a long snake, then wrapped around the top of the cake, like this:


I know that this doesn't look very pan-like, but it will very soon. Because this isn't just an empty pan, it's a pan with food inside! So I put some yummy food** in there (:


All I did was throw some buttercream on top and gently smoothed it out*** with my spatula. Spongebob was right, spatulas really are magic!


Doesn't it look purty? (:
But unfortunately, no one wants to eat plain, white, creamy soup. So let's spice things up a bit. First ingredient....


Peas! Remember these guys? They finally made their way onto a cake (:
But as awesome as peas are,**** this stew is still looking a little bland to me... So let's chop up one of those big carrots we made in the beginning and toss them in there too.


There. That looks MUCH better (:
But it's still missing something... The stew looks edible, but our pan is still kinda iffy. It needs a handle.

And as much as I've been calling it a pan, it's really more of a pot. So the handles were short and stubby, like pot handles.


These were fairly simple. All I had to do was wrap the brown fondant around these plastic tubes, then tie them up in a way that they would make the shape I wanted. After drying overnight, I slipped them off the tubes and stuck them into the cake. But because of the way they were put in, instead of using gumpaste glue, I used icing to make them stick.


This is what the pot of stew looked like at the end (can you see the pieces of the board? Take it as a sneek peek into the next post ;D)

We are now one step closer to finishing the Ratatouille posts!
Next is the second cake that went with the set, then how I tied up the ensemble for the party. So stick around if you want to find out how it turned out!


*Only when there's no one looking cause it makes my mommy mad (;
**And by food, I mean buttercream
***Slightly, I left some ruffles to make it look natural
****Come on, have you seen Veggie Tales? The French Peas are the bomb! And of course, we are NOT, under any circumstances, allowed to eat cartoon characters. So no peas for dinner, ever again. Mwahaha. Take that mom (;

Thursday, April 21, 2011

Ratatouille Cake... The Chef: Remy - Part 2

Remember Remy? It's been a while. Remy had a little 'fall out' with his arm, and well... It just took a while to um... remedy the situation. But now that everything's all fixed again, Remy is back and ready for action! (Just don't touch his arm... please?)

Day Two? Eh, not so much. Let's stick to Part Two.
Well, what's a rat without his hands, feet, and tail? Or a chef without his hat (We've gone over this remember? A magician needs a sorcerer's hat and a chef needs a chef's hat) and apron and dish towel? So that's what we worked on during Part 2.


First off, let's see how well Remy did without all that extra back (and head and arm) support.


Yes, I am aware that this is Remy sort of already ready, but I forgot to take a picture before I started. Usually I just take pictures of the final product, so this is all new to me. Please bear with me, I promise I'll get better at this (:
Anyways, Remy is holding up great! He can even hold his wooden spoon!

Hehe. That was written before the 'fall out'. Point is, he could hold the spoon before losing his arm.

Remember how I said that the nose and eyes were hard to make? Yea, well the hands beat those BY FAR! Once again, two pink round cuts of pink fondant*, but this time a little thicker. About a third of an inch high. Then I rolled the round cut into an oval, and came along with my handy, dandy, small, but sharp knife and cut out fingers for this sucker. Then I rounded them into finger shapes using my hands. The thumb wasn't anything special, I just made it shorter**. Sounds simple? Yea. Done easily? NOPE. These hands took forever to make. I tried and retried a good 20 times. Pesky hands... 

Well, to add insult on injury, as I was putting the hands on, one of Remy's arms decided to fall off (uncooperative much?). I fixed this pretty quickly with a small toothpick*** and left him drying a little longer. While Remy was drying his hands, I worked on his feet, which weren't quite as much work as the hands, but still not the easiest part of this cake (I still can't believe I thought the nose and eyes were difficult... Those were kindergarten material compared to hands and feet...).

That was his right arm... The fall out occurred with the left. So neither of Remy's arms were very nice to me... =/


These were made using the same method as the hands, except thinner and the feet have less fingers (...toes) than the hands. I left them drying on that little wavy drying fondant rack while I worked on other stuff so they would have a nice arch.

And of course, it's not a rat if it doesn't have a tail!


The tail is fairly simple to make. Just get a log of pink fondant and roll it in your hands until it looks like a tail and then cut it to the size you want it to be. And of course, make the tip thinner than the part that connects to the rat.


And these little suckers are whiskers! Same technique as the tail, except smaller and in white. Once they dry, they'll be going on Remy's snout.

And these little guys are...


You guessed it! Teeth! It's kind of hard to see, but it's essentially just a small white fondant square with a line cut down the middle.

Now that we have most of the essentials for Remy, let's have a review really quick, Every chef needs a...

...chef's hat! So of course, Remy needs a Remy-sized chef's hat! 


This hat was made in the same fashion as the ones made for the cupcakes, only longer. Remy also has a little collar and towel. The collar is just a very thin strip of white wrapped around his neck, and the towel is a rectangle shaped piece of fondant that got draped over his arm.


The next part, in theory, is fairly simple. All you have to do is glue everything on Remy! Easy right?
Well, you have to be very careful as you do this, or else Remy will fall apart. Poor guy, he's been through enough don't you think? So let's be very careful with him.

First, on go the feet. They were fairly simple to glue on, considering the rest of Remy. All I had to do was measure them in a way that I thought looked good then glued him up. The whiskers, on the other hand, were a pain in the butt. I glued them on, they fell, I glued them on again, and they fell again. After maybe the fifth repetition of this tedious process, I gave up and just stuck the whiskers in his face, creating a small and unnoticeable hole where the whiskers could fit in.


The teeth were pretty difficult as well, but because they're so unnoticeable, I pushed them back a little to make them fit in the hole of his mouth**** 
The hat was very simply glued on, since Remy's head was so nicely flat I didn't have much trouble with it.


Finally, the tail just got glued on veryyy gently. But it kept falling off, so I waited until Remy was completely ready and on the cake before attaching his tail.

And that's Remy in the making!
In the end I just gave him his wooden spoon and put him in between a pot and a slice of cheese.*****


And that's all for this post. Stay tuned to learn all about Remy's pot of stew and his chunk of cheese (;


*With lots of gum paste... catching on yet? (;
** Only Pixar would give a rat thumbs... And Disney of course, we can't forget our favorite mouse, Mickey (:
***Or maybe it was a big toothpick that I cut into small toothpick size
****Which now that I think about it, isn't that where they're supposed to be?
*****I'll teach you how to make those soon (;

Wednesday, April 6, 2011

Ratatouille Cake... The Chef: Remy - Part 1

This... 
Courtesy of PhotoBucket
...is Remy. Say hi to Remy folks, cause this post is dedicated to him.
I have spent the past 2 days attempting to replicate our good friend over here, and while I haven't quite done him justice, I think he turned out pretty well. We all love getting portraits done of ourselves; that's why we spend $20 at Six Flags to get a caricature done, when we could be using those $20 towards a cake from Brunna's Bakery (Shaking my head... Cakes are SO much better tasting than watercolors). Well, portraits are all great and stuff, but sculptures are even better, and that's just what Remy got, for free nonetheless! Lucky guy. And as an added bonus, he gets his sculpture on a cake. That's a double whammy right there guys. Remy is one lucky fellow.

Anyways, onto the actual fondant Remy*.
Fondant takes a while to dry, but especially when it's in large heaps of it. For example:

Courtesy of Photobucket because I'm too lazy to get up and take a picture of my own fondant.

THAT will take a while to dry out (hopefully it doesn't anytime soon cause I still need to use it...). So of course, a little life-sized Remy will take a large amount of time to dry. And by a large amount of time, I mean overnight. So he's going to take me a decent amount of time and effort. Soooo, here we go.


Here's a top view of Remy after Day Uno. He's almost complete, except for the missing hands, feet, tail, mouth and very wobbly arms. And a cutesy collar I plan on adding later on. He also has a hard time keeping his eyes, ears, and nose on. Sooo, he'll look a little better on Day Two.

First off, we need a body for Remy. So with a nice chunk of fondant** I molded a sort of rat shape body for him.

Thank you Sharon Z. for the picture, since I didn't take one of my own

Okay... He has a little belly...
And with a lovely little tool I made fur on him. Now I have absolutely no idea what this tool is called***, so I'm including a picture of it.


There it is (: 
I went all over Remy with this tool. First in straight lines down his back, then in diagonal lines to the right, then to the left. I did this for maybe a minute or two, then I got tired and just went crazy with it. I figured that this technique will work for fur or feathers, but feathers will need to be a bit more organized.


It looks more realistic from a distance, I think.

Now, as you can see, Remy here already has ears (and in the previous picture he has a nose and eyes). I don't have individual pictures of those, but here's the verbal (er... legible?) how-to for it.

Ears: First, a slab of pink fondant and the small round cutter will do. Cut out two round pink slabs (hmm... 2 slabs of pink, two ears... coincidence maybe?). All I did was take the two round circles and slightly pinched them into ear shape, then I came along and glued them to Remy's head (which trust me, took FOREVER, since I couldn't decide on angle or ear size or location or etc etc).

Nose: I bet you think this was easy huh? NOT. That little nose gave me more problems than I thought possible. Making it initially was fairly simple: Pink ball of fondant rolled into nosey shape. The trick? Pin the nose on Remy. It's quite a fun game, you should try it next time you gave 15-20 minutes to waste. It's a popular one at kids parties. Wait... Maybe the popular one is pin the tail on the donkey? Eh, same difference. Remy is just a whole lot tougher. Finally I decided to use the round ball tool to poke a small hole into one end of Remy's nose so I could just fit it onto his snout and then glue it. It took a little remolding once it was on the snout, but that was easily accomplished with some quick finger work.

Eyes: Here's something you should know about fondant: the smaller the piece, the more difficult it is. And these eyes took some work. The thing about eyes is that they can make or break the sculpture/picture/painting/etc. Eyes are the windows to the soul and if Remy's eyes looked like... well, like these:

Courtesy of British Horror Films

...the picture speaks for itself. Remy wouldn't be the cute little mousey he is, now would he? So I had to try my best on these eyes, so Remy wouldn't look like a rat from Goosebumps (I still can't eat Cheez-its because of them... Looooong story). So after 4 or 5 sets of eyes, I decided to go with these:


Not exactly Mickey Mouse, but definitely cuter than Mr. Werewolf's up there. These lookers were made out off itsy bitsy teeny weeny white gumpaste balls and even tinier itsy bitsy teeny weeny black fondant balls. Then using toothpicks (because my fingers are too big to hold onto them), i rolled them into the roundish shapes you see, and I placed the black ones on top of the white ones, then both of them together on Remy. (Remember the little indent on his forehead? That's were the eyeballs fit into)

Yay for rat faces!!!**** That was the total amount of work for Day One of Remy. I left him sitting on the table drying overnight (and oh boy was I praying that someone wouldn't bump him over. My little brother enjoys having imaginary sword fights in the living room, and I've seen many vases fall to his plastic sword's wrath).


*Once again, with lots of gum paste included
**AND GUM PASTE
*** If you do know the official name, please enlighten me
**** Any one else read Island? Awesome series.